Channel Broken, Bias Shifted – Is ZB Ready to Collapse?
The Loot
•
July 7, 2025
Channel Broken, Bias Shifted – Is ZB Ready to Collapse?
The Loot
•
July 7, 2025

The 30-Year U.S. Treasury Bond Futures (ZB) has officially snapped. After riding a clean ascending channel throughout June, price has decisively broken down through the lower boundary a structure it had respected for weeks. Now it’s all about one thing: can sellers defend this breakdown, or was it a trap?
The Setup
Let’s break down the chart:
Channel support gave way last week after price printed a series of lower highs.
This breakdown has now pushed price into a key demand zone between 113’06 and 112’30 marked as support (S).
Above us, multiple zones of supply are stacked:
Mid-zone at ~113’26–113’32
Major resistance between 114’16–114’28, which aligns with the underside of the broken channel
Add to that a macro backdrop filled with uncertainty, bond market repricing, and rate cut speculation and you’ve got all the ingredients for a high-probability trade setup.

Bearish Trade Plan
This is a classic break-and-retest setup:
"When structure breaks, expect a retest and if it holds, stack your bias."
Here’s how we’re attacking it:
Entry Zone: 113’24–113’30
→ Retesting broken channel and supplyStop Loss: Above 114’00 (or 114’16 for wider risk tolerance)
Take Profits:
TP1 → 113’00
TP2 → 112’10
TP3 → 110’00 (swing target)
We’re watching for a clean rejection at the mid supply zone. If price pushes into resistance and fails to reclaim the channel, it confirms bearish intent and we’re loading short.
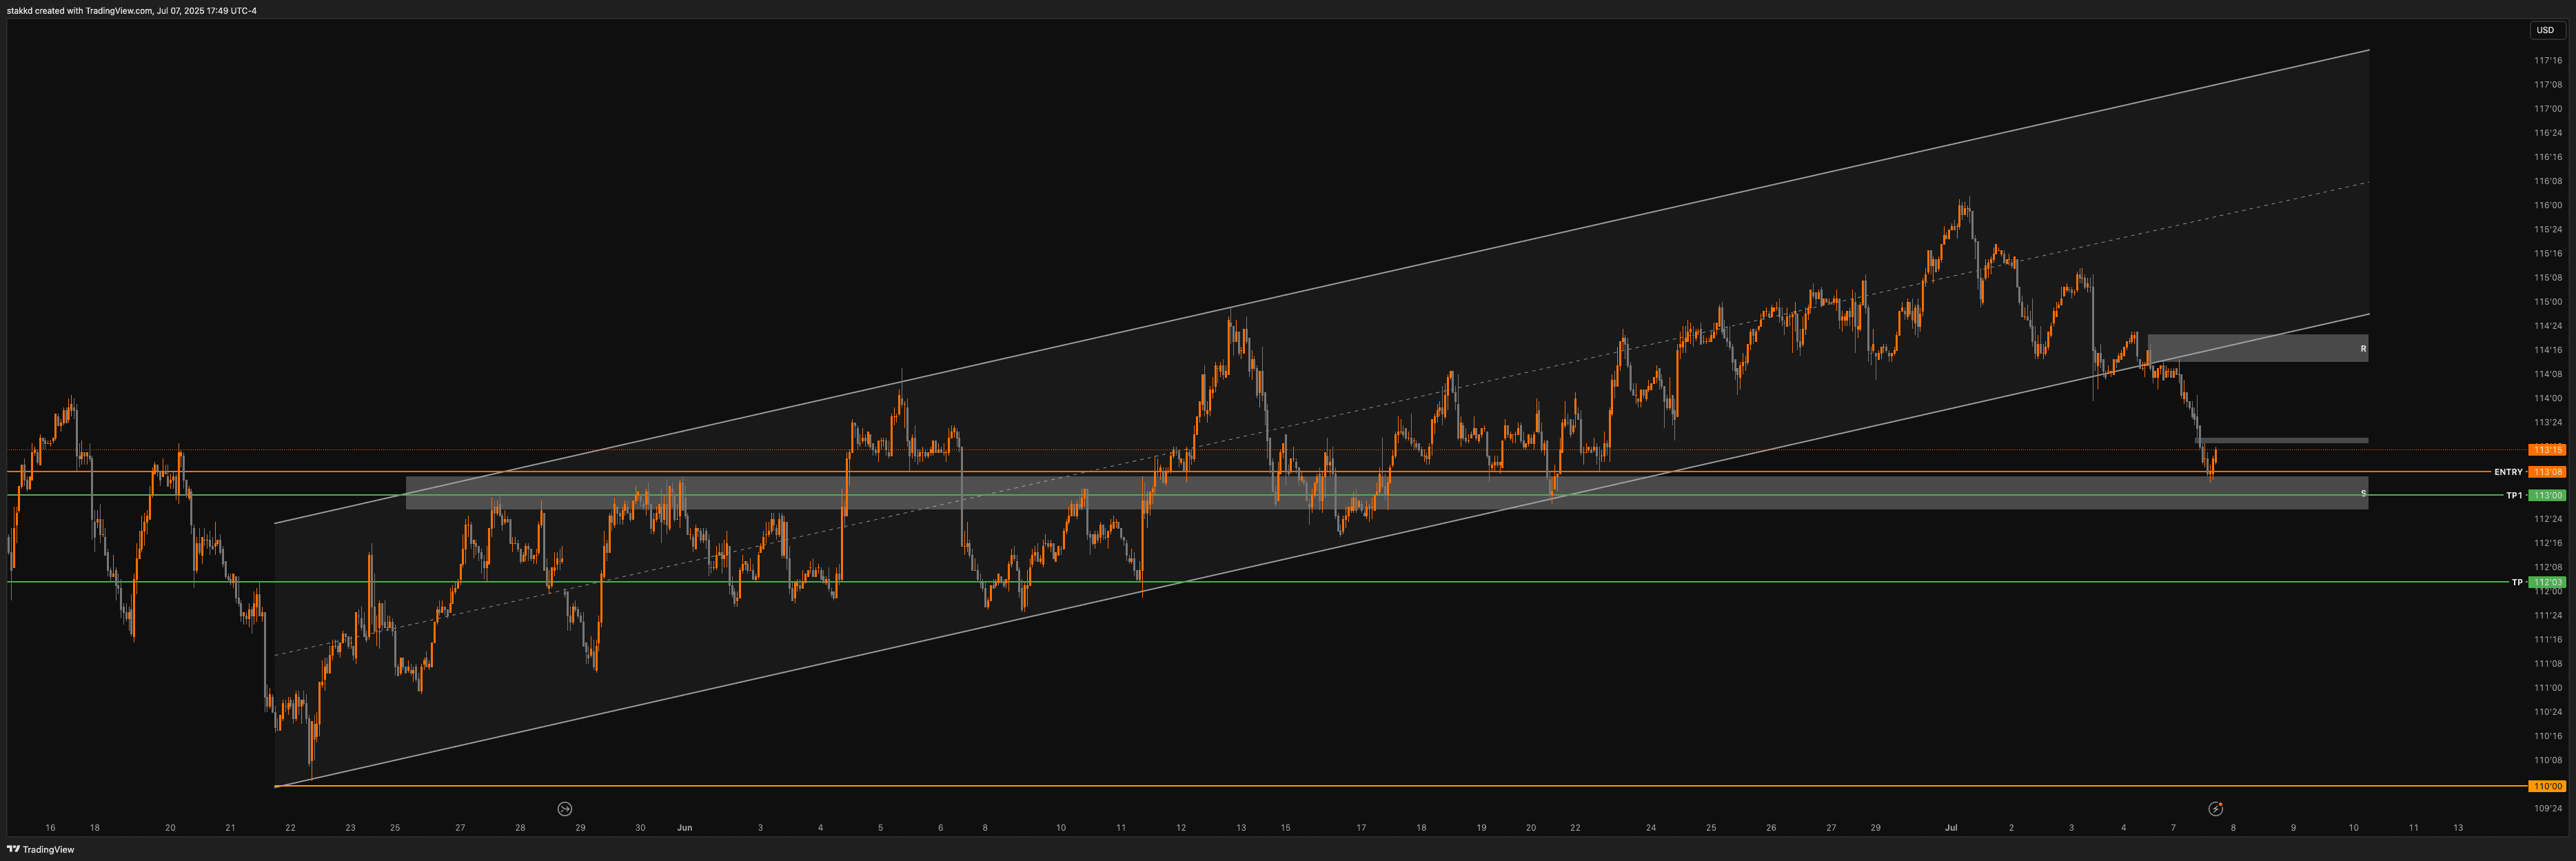
Bullish Counter-Scenario
There’s one scenario where bulls could flip the narrative:
If price defends the support zone (S) around 113’00–112’30
And aggressively reclaims 113’32–113’40 with volume and momentum
That would open the door for a retracement rally back to 114’16–114’28
But until that happens, this market looks heavy.
Conclusion
This is what high-probability structure shifts look like. Clean channel breakdown, retest in play, and high confluence zones marked out.
Stay patient. Don’t front-run the move let price tell the story. If 113’30 gets rejected, we’re short. If bulls reclaim it, we’ll reassess.
Bias: Bearish
Focus: Reaction to 113’30 zone
Timeframe: Intraday to multi-day swing
Disclaimer
Staakd and its content are strictly for educational and informational purposes only.
We are not financial advisors, brokers, or licensed investment professionals. All content published on this website, including blog posts, trade setups, charts, commentary, and visual media, reflects our own opinions and market analysis. It should not be interpreted as financial advice or a recommendation to buy or sell any financial instrument.
Trading futures, forex, and other leveraged products involves significant risk and is not suitable for every investor. You should carefully consider your level of experience, risk tolerance, and investment objectives before engaging in any trading activity. Always do your own research and consult with a qualified financial advisor before making any trading decisions. Staakd is not liable for any loss or damage arising directly or indirectly from reliance on any information provided on this site or in associated content. Past performance does not guarantee future results. By using this site, you acknowledge and agree to this disclaimer in full.
The Setup
Let’s break down the chart:
Channel support gave way last week after price printed a series of lower highs.
This breakdown has now pushed price into a key demand zone between 113’06 and 112’30 marked as support (S).
Above us, multiple zones of supply are stacked:
Mid-zone at ~113’26–113’32
Major resistance between 114’16–114’28, which aligns with the underside of the broken channel
Add to that a macro backdrop filled with uncertainty, bond market repricing, and rate cut speculation and you’ve got all the ingredients for a high-probability trade setup.
Bearish Trade Plan
This is a classic break-and-retest setup:
"When structure breaks, expect a retest and if it holds, stack your bias."
Here’s how we’re attacking it:
Entry Zone: 113’24–113’30
→ Retesting broken channel and supplyStop Loss: Above 114’00 (or 114’16 for wider risk tolerance)
Take Profits:
TP1 → 113’00
TP2 → 112’10
TP3 → 110’00 (swing target)
We’re watching for a clean rejection at the mid supply zone. If price pushes into resistance and fails to reclaim the channel, it confirms bearish intent and we’re loading short.
Bullish Counter-Scenario
There’s one scenario where bulls could flip the narrative:
If price defends the support zone (S) around 113’00–112’30
And aggressively reclaims 113’32–113’40 with volume and momentum
That would open the door for a retracement rally back to 114’16–114’28
But until that happens, this market looks heavy.
Conclusion
This is what high-probability structure shifts look like. Clean channel breakdown, retest in play, and high confluence zones marked out.
Stay patient. Don’t front-run the move let price tell the story. If 113’30 gets rejected, we’re short. If bulls reclaim it, we’ll reassess.
Bias: Bearish
Focus: Reaction to 113’30 zone
Timeframe: Intraday to multi-day swing
Disclaimer
Staakd and its content are strictly for educational and informational purposes only.
We are not financial advisors, brokers, or licensed investment professionals. All content published on this website, including blog posts, trade setups, charts, commentary, and visual media, reflects our own opinions and market analysis. It should not be interpreted as financial advice or a recommendation to buy or sell any financial instrument.
Trading futures, forex, and other leveraged products involves significant risk and is not suitable for every investor. You should carefully consider your level of experience, risk tolerance, and investment objectives before engaging in any trading activity. Always do your own research and consult with a qualified financial advisor before making any trading decisions. Staakd is not liable for any loss or damage arising directly or indirectly from reliance on any information provided on this site or in associated content. Past performance does not guarantee future results. By using this site, you acknowledge and agree to this disclaimer in full.
Share
Copy link
Share
Copy link
Share
Copy link
Related


Built by traders. Run on proof.

© Staakd
2025
Sign up for real trades. No noise
Built by traders. Run on proof.
© Staakd
2025
Sign up for real trades. No noise
Built by traders. Run on proof.
© Staakd
2025
Sign up for real trades. No noise