Bounce or Bull Trap?
Playbook
•
July 26, 2025

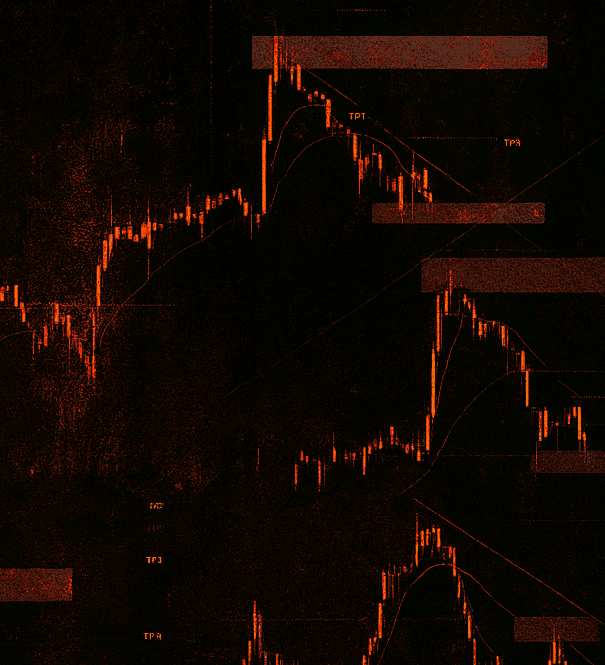
AUD/USD staged a sharp recovery from last week’s lows, reclaiming multiple levels and running into key resistance around 0.6570. But after tagging that area, price rejected sharply and is now testing back into a well-defined support zone. The question heading into Monday is: Will the Aussie reload for another leg, or stall into another fade?
Price Structure Breakdown
After bottoming near 0.6370, price surged in an impulsive bullish leg.
The rally ran into resistance near 0.6570–0.6580, where multiple rejections occurred.
Current price is retesting the support zone at 0.6510–0.6525, which is a former breakout area.
So far, this is a textbook bullish pullback but confirmation is still needed.
Key Zones
TypePrice AreaNotesResistance (R1)0.6570 – 0.6580Recent high; rejection zone. Must break for trend continuation.Support (S1)0.6510 – 0.6525Current bounce zone. Prior consolidation and breakout area.Support (S2)0.6450 – 0.6470Deeper level. If S1 breaks, this zone likely tagged next.Macro Support0.6370 – 0.6380Major low. Structure invalidation point.
Bias for the Week Ahead
Bias: Bullish (Conditional on Holding 0.6510)
Momentum favours bulls, especially after the impulsive rally from 0.6370.
However, the rejection from 0.6570 shows that sellers are active at highs, so we need a higher low confirmation near 0.6510 to re-engage long bias confidently.
Trade Scenarios
Scenario 1: Bullish Continuation
Entry: Long from 0.6520–0.6535, ideally on bullish engulfing or higher low confirmation.
TP1: 0.6560
TP2: 0.6580
TP3: 0.6610+
SL: 0.6490
This trade bets on the bull trend holding structure. High RR if it runs clean.
Scenario 2: Bearish Breakdown
Entry: Short below 0.6500 with strong bearish candle or retest rejection
TP1: 0.6470
TP2: 0.6450
SL: 0.6530
Best if DXY strengthens or commodity sentiment shifts risk-off. Watch AUD correlations with metals.
Scenario 3: Range Play
If price remains between 0.6520–0.6570:
Buy lower end (0.6510–0.6525), sell upper (0.6565–0.6575)
Tight stops, scalp-style management
Only valid if Monday opens sideways with low volume.
Summary Table
Direction Bias Trigger
✅ BullishStrong (if 0.6510 holds)Higher low + bullish confirmation
⚠️ BearishMediumBreakdown + close below 0.6500
❎ RangeLowIf no directional momentum early week
Weekly Watchlist
Monday NY session: Key to see if support holds or breaks
China data / commodities: Major AUD drivers
US Dollar (DXY): If DXY drops, AUD likely rallies
Final Take
AUD/USD looks like it’s trying to build a higher low. The next 24–48 hours are crucial if bulls can defend 0.6510, a retest of 0.6570+ is likely. But if that zone fails, we could revisit the 0.6450s quickly.
Disclaimer
Staakd and its content are strictly for educational and informational purposes only.
We are not financial advisors, brokers, or licensed investment professionals. All content published on this website, including blog posts, trade setups, charts, commentary, and visual media, reflects our own opinions and market analysis. It should not be interpreted as financial advice or a recommendation to buy or sell any financial instrument.
Trading futures, forex, and other leveraged products involves significant risk and is not suitable for every investor. You should carefully consider your level of experience, risk tolerance, and investment objectives before engaging in any trading activity. Always do your own research and consult with a qualified financial advisor before making any trading decisions. Staakd is not liable for any loss or damage arising directly or indirectly from reliance on any information provided on this site or in associated content. Past performance does not guarantee future results. By using this site, you acknowledge and agree to this disclaimer in full.
Share
Copy link
Share
Copy link
Share
Copy link
Related


Built by traders. Run on proof.

© Staakd
2025
Sign up for real trades. No noise
Built by traders. Run on proof.
© Staakd
2025
Sign up for real trades. No noise
Built by traders. Run on proof.
© Staakd
2025
Sign up for real trades. No noise